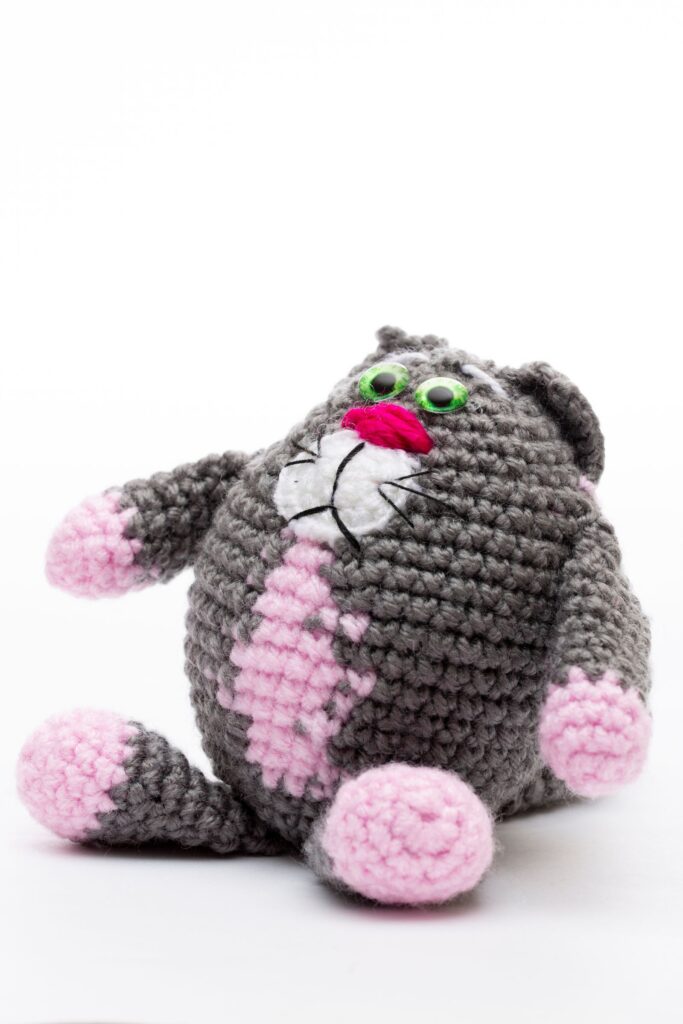
This little cat has a big round head, tiny pointed ears and a curly tail, the classic kawaii proportions that make everyone say “aww”. It’s small enough to clip onto your keys, backpack or bag zipper, and quick enough to make a whole litter in different colors for friends.
The finished cat is about 7 cm (2.75 in) tall and takes around an hour. It’s a great second or third amigurumi project once you’re comfortable with the magic ring, increases and decreases.
Materials
- Worsted weight (#4) cotton or cotton-blend yarn: main color (about 10 g), plus pink scrap for the inner ears (optional)
- 3.5 mm (E/4) crochet hook
- 6 mm safety eyes (1 pair), or black thread to embroider
- Small amount of polyester fiberfill
- Black and pink embroidery floss
- Keychain clasp with a jump ring
- Yarn needle, stitch marker
Choosing yarn? See our guide to the best yarn for amigurumi. Gray, cream, orange and black-and-white combinations all make adorable cats.
Abbreviations (US terms)
MR = magic ring · sc = single crochet · inc = 2 sc in the same stitch · dec = invisible decrease · sl st = slip stitch · ch = chain · (…) x6 = repeat 6 times · (18) = stitches at the end of the round.
Work in continuous rounds without joining, and move your stitch marker up each round.
Head
- R1: 6 sc in MR (6)
- R2: inc x6 (12)
- R3: (sc, inc) x6 (18)
- R4: (2 sc, inc) x6 (24)
- R5–R9: sc around (24) — 5 rounds
Insert the safety eyes between R7 and R8, with 4 stitches between them. Place them a little wide apart for the kawaii look.
- R10: (2 sc, dec) x6 (18)
- R11: (sc, dec) x6 (12). Stuff the head firmly.
- R12: dec x6 (6)
Fasten off and close the hole by threading the tail through the front loops of the last 6 stitches.
Ears (make 2)
- R1: 4 sc in MR (4)
- R2: (sc, inc) x2 (6)
- R3: (2 sc, inc) x2 (8)
Fasten off with a long tail. Don’t stuff the ears. Flatten each ear so it forms a small triangle.
Body
- R1: 6 sc in MR (6)
- R2: inc x6 (12)
- R3: (sc, inc) x6 (18)
- R4–R6: sc around (18) — 3 rounds
- R7: (sc, dec) x6 (12)
- R8: sc around (12)
Fasten off with a long tail for sewing. Stuff the body lightly.
Paws (make 2)
- R1: 4 sc in MR (4)
- R2: sc around (4)
Fasten off with a tail. Don’t stuff.
Tail
Ch 11. Starting in the 2nd chain from the hook, work 2 sc in each chain across (20). The extra stitches make the tail curl naturally. Fasten off with a tail.
Assembly
- Head to body: sew the open top of the body to the bottom of the head, centered under the face.
- Ears: pin the ears on top of the head, between R3 and R5, slightly toward the sides. Sew them on along the flat bottom edge. For pink inner ears, embroider a small triangle of pink yarn on the front of each ear.
- Paws: sew the two paws to the front of the body, just under the head.
- Tail: sew the tail to the back of the body, low down, so it curls up the side.
- Face: with black floss, embroider a tiny “w” shaped mouth between and just below the eyes. Add two or three short whiskers on each side. Stitch small pink ovals for cheeks under the outer corners of the eyes.
- Keychain: attach the jump ring through two stitches at the top of the head, between the ears, then add the clasp.
Variations
- Calico cat: embroider orange and black patches on a cream cat.
- Sleepy cat: skip the safety eyes and embroider closed “U” shaped eyes.
- Tuxedo cat: make the body in white and the head in black, and embroider a white patch around the mouth.
- Bigger cat: use chunky or chenille yarn with a 5 mm hook and 10–12 mm eyes for a palm-sized plush.
Tips
- Keep stitches tight so no stuffing shows; this piece gets handled a lot.
- Sew the ring through two stitches so it can’t pull out.
- For children under 3, embroider the eyes and use a soft yarn loop instead of a metal clasp. Our safety eyes guide explains the safe options.
FAQ
How long does this keychain take?
About 60–75 minutes, including sewing.
Can I make it without a keychain?
Yes. Leave off the clasp for a little desk buddy, or add a loop of cord to make an ornament.
Can I sell the cats I make?
Yes, finished items are fine to sell. Please credit Crochet By Luma Art and don’t share or resell the pattern.
Love tiny makes? Try the gingerbread keychain next, and pin this kitty for later!
Cover photo: inspiration photo by Valentin Ivantsov on Pexels